Proxmox Ceph Networking: Why I Split My 10GbE NICs

I had three identical mini PCs, one dual-port 10GbE card in each, and an eight-port 10G switch. That is not enough ports to do everything the documentation assumes you can do, and working out what to give up took longer than the actual install.
By the end of this post you will know how to lay out the networking for a 3-node Proxmox VE and Ceph cluster on exactly two 10G ports per node, why I ended up splitting them instead of bonding them, and the four things that broke on me so they do not break on you.
The short version
With two 10G ports per node, use one port for management and VM traffic (VLAN-tagged, on a bridge) and give the second port entirely to Ceph as a bare interface with jumbo frames. Do not bond them. Bonding forces every VLAN onto one bridge, which drags your management interface up to MTU 9000, and LACP hashing cannot reliably split the handful of flows a 3-node Ceph cluster generates anyway. Put corosync on its own VLAN on the first port, with a second ring on the Ceph port so one dead cable cannot take both.
Here is the detail, including the parts where my first plan was wrong.
The constraint sets the design, not the other way round
Three nodes, each with one dual-port 10GbE card plus an onboard 1GbE. One XikeStor SKS8300-8T, which is eight 10G ports. Boot on a 128GB drive, a 2TB NVMe per node reserved for Ceph.
Six ports for the nodes plus one uplink is seven. That leaves exactly one spare, and it is the reason this cluster is capped at three nodes until I buy a bigger switch. Worth knowing that up front rather than discovering it when you want to add a fourth.
I started out assuming I had four 10G ports per node. I did not. That single correction changed the entire design, which is a good argument for counting your ports before you draw any diagrams.
Why not a full mesh
For exactly three nodes there is a tempting option: skip the switch for Ceph entirely and direct-attach every node to the other two. Proxmox VE 9 made this much easier with SDN Fabrics, which configures OpenFabric routing from the GUI instead of hand-editing FRR configs. [VERIFY: SDN Fabrics availability and OpenFabric option in the current PVE release]
It needs two ports per node for the mesh though, which would leave nothing for VM traffic. And the Proxmox documentation itself recommends switches over a mesh if you plan to grow past three nodes, which I do. A mesh would have been a dead end I would have to tear down later.
So: switched, and the two ports get split by role.
Split or bond: the decision that shapes everything
This is where I spent the most time, so let me give you the honest version of both sides.
The case for bonding. Two ports in an LACP bond gives you 20G of aggregate and survives a dead cable. On paper that is strictly better.
Why it does not hold up here. LACP hashes per flow, so no single connection ever exceeds 10G. A 3-node Ceph cluster with size=3 generates very few flows: a primary OSD replicates to exactly two peers. With that few flows the hash is lumpy. Both Ceph streams can easily land on the same bond member while the other sits idle, and no QoS policy can move them, because LACP picks the physical port before QoS ever sees the frame.
And the redundancy is thinner than it looks. Both ports live on the same dual-port card. A card or PCIe failure takes out both regardless of bonding, so the bond only ever protects against a cable, transceiver, or switch port failure.
The part that decided it: jumbo frames. With a bond, Ceph has to live on a VLAN subinterface of the bridge. A VLAN interface cannot exceed its parent bridge’s MTU, so jumbo on Ceph forces the whole bridge to 9000, which drags the management interface with it. Split the ports and Ceph sits on a bare interface with no bridge involved, so it takes MTU 9000 and nothing else is affected.
I did seriously consider bonding with QoS, weighting Ceph, VM traffic and corosync by percentage. The switch supports it: the SKS8300 does SP, WRR and SP+WRR queue scheduling. But two things killed it. Hard caps waste the link when only one class is active, so you want weights rather than caps. And weights still cannot fix hash imbalance across bond members. Good idea, wrong problem.
The VLAN layout
| VLAN | Purpose | Subnet | Interface | MTU |
|---|---|---|---|---|
| 2 | Management | 10.48.2.0/24 | vmbr0.2 (port A, tagged) | 1500 |
| 30 | Virtual machines | 10.48.30.0/24 | vmbr0 (port A, untagged) | 1500 |
| 50 | Ceph | 10.48.50.0/24 | port B, bare | 9000 |
| 51 | Corosync ring0 | 10.48.51.0/24 | vmbr0.51 (port A, tagged) | 1500 |
Three deliberate choices in there.
Management gets its own VLAN. My original layout had the hypervisor sitting on the VM subnet, which is how a lot of homelabs end up by default. Moving it to VLAN 2 means vmbr0 carries no IP at all: VMs still reach VLAN 30 through it, the host just does not participate.
VLAN 30 is untagged on the wire. Proxmox assigns any VM without a tag to the bridge’s default PVID, so untagged VM frames leave the node untagged and the switch drops them into VLAN 30. VMs needing another VLAN get an explicit tag. One consequence: never use VLAN 1 for anything, because a VM tagged 1 behaves identically to an untagged one.
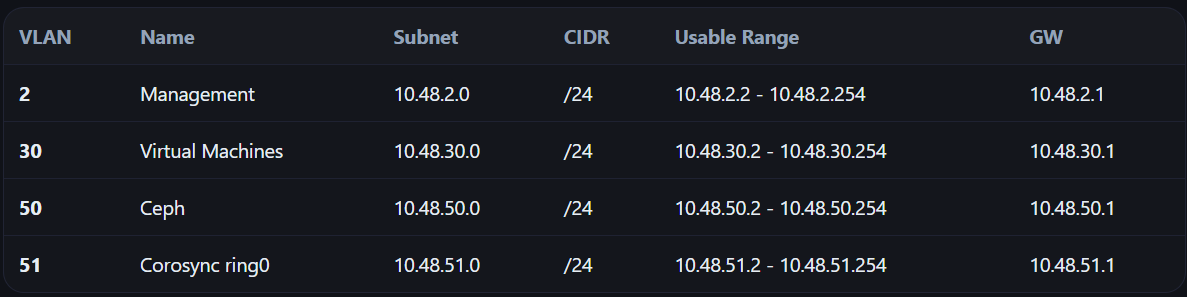 The layout I settled on. Management on its own VLAN was a late change, and the right one.
Corosync rings sit on different physical ports. Ring0 on VLAN 51 (port A), ring1 on VLAN 50 (port B). Corosync runs its links in passive mode, so ring1 carries nothing unless ring0 fails and never competes with Ceph in normal operation. But it means a dead cable on port A does not cost you both rings. A bond cannot give you that, because both rings ride the same aggregate.
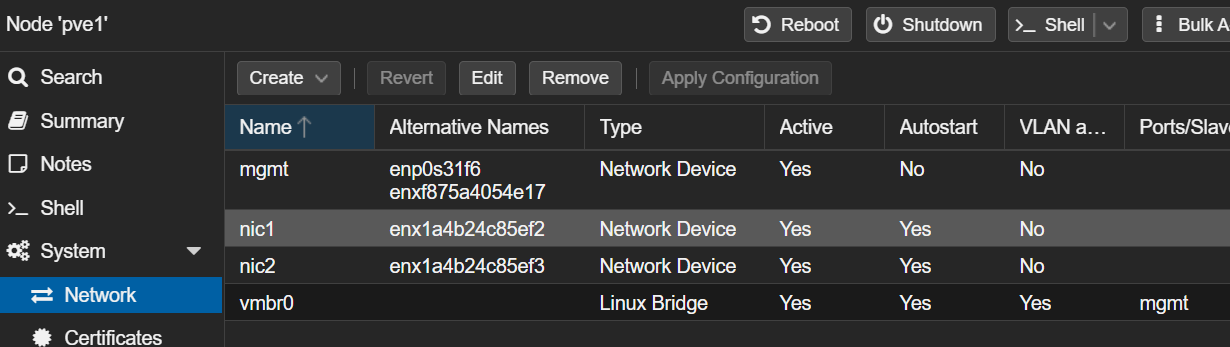 Pinned interface names on pve1. Renaming via MAC-matched link files means the names survive PCI renumbering, which matters once Ceph and corosync are bound to specific ports.
The interfaces file
This is pve1. Increment the last octet for the other two.
1
2
3
4
5
6
7
8
9
10
11
12
13
14
15
16
17
18
19
20
21
22
23
24
25
26
27
28
29
30
31
32
33
auto lo
iface lo inet loopback

# 1GbE, kept as a management fallback on VLAN 2. Not bridged.
auto eno1
iface eno1 inet static
        address 10.48.2.211/24

# --- Port A: management, VM traffic, corosync ring0 ---
iface enp1s0f0 inet manual

auto vmbr0
iface vmbr0 inet manual
        bridge-ports enp1s0f0
        bridge-stp off
        bridge-fd 0
        bridge-vlan-aware yes
        bridge-vids 2-4094

auto vmbr0.2
iface vmbr0.2 inet static
        address 10.48.2.201/24
        gateway 10.48.2.1

auto vmbr0.51
iface vmbr0.51 inet static
        address 10.48.51.201/24

# --- Port B: Ceph only. No bridge, so jumbo is safe here. ---
auto enp1s0f1
iface enp1s0f1 inet static
        address 10.48.50.201/24
        mtu 9000
That 1GbE address is worth keeping. I had originally planned to reserve the port for a future switch uplink, but as a permanent way back in on VLAN 2 it earns its place every day, especially if you do not have a KVM on the rack yet.
Apply with ifreload -a, one node at a time, checking you can still reach it before moving to the next.
Verify jumbo before you touch Ceph
1
ping -M do -s 8972 -c3 10.48.50.202
8972 is 9000 minus 28 bytes of headers. If that fails while a normal ping works, your switch jumbo setting did not take. Fix it now, because Ceph on an inconsistent MTU fails in ways that look convincingly like a hardware fault.
Cutting over without losing access
My nodes started life reachable on the 1GbE, so I used it as a lifeline rather than dragging a monitor to each box. Three phases:
- Ceph link first. Configure port B only. It touches nothing else, so there is zero risk.
- Parallel management. Bring up port A as a second bridge with the VLAN 2 address while the 1GbE keeps working. Two separate bridges with one uplink each do not form a loop, so running both is safe. Verify you can reach the new address before going further.
- Cut over. Add VLAN 30 untagged to port A at the switch, write the final config, reload, reconnect on the new address.
Leave VLAN 30 off port A until phase 3, so you never briefly have two interfaces in the same broadcast domain.
Building the cluster
Corosync ring0 on VLAN 51, ring1 on VLAN 50:
1
2
3
4
5
6
7
8
9
# pve1
pvecm create labcluster \
  --link0 address=10.48.51.201,priority=100 \
  --link1 address=10.48.50.201,priority=50

# pve2 and pve3, joining by hostname (this matters, see below)
pvecm add pve1.lab.mylemans.online \
  --link0 address=10.48.51.202 \
  --link1 address=10.48.50.202
Then check both rings, not just quorum. A dead ring1 is completely silent in pvecm status:
1
corosync-cfgtool -n
Ceph next, pinned to the Ceph network:
1
2
3
4
pveceph install          # all three nodes
pveceph init --network 10.48.50.0/24
pveceph mon create       # all three nodes
pveceph mgr create       # at least two
One check is worth more than all the others here:
1
ceph mon dump
The MON addresses must be on 10.48.50.x. If a MON bound to your management network, Ceph works perfectly and every byte of replication quietly runs over the wrong link at MTU 1500. You will not find out until you benchmark.
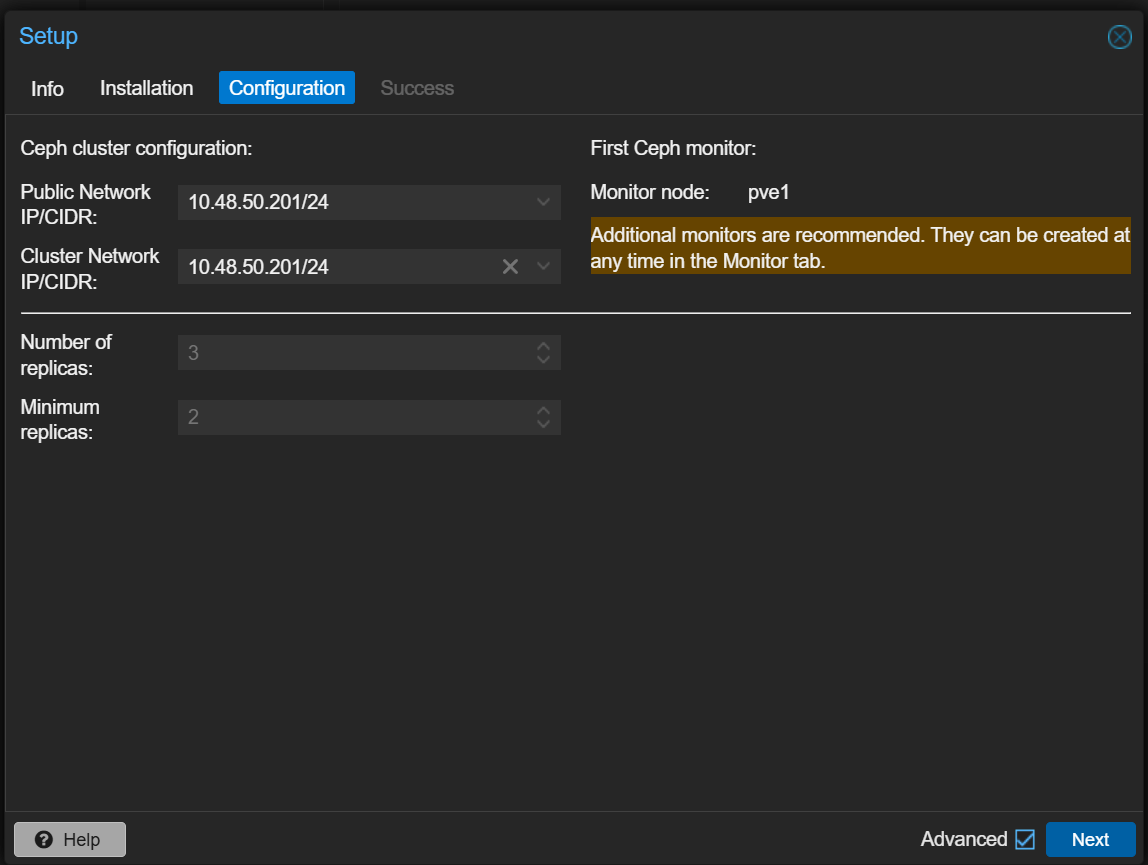 Pinning Ceph to 10.48.50.0/24 at init. Leave the cluster network blank when both would use the same physical link.
The four things that actually broke
This is the part I would have wanted to read first.
1. Creating the cluster before reloading the network
I ran pvecm create before running ifreload -a, so corosync recorded addresses that did not exist yet. Fixing it means dissolving the single-node cluster back to standalone:
1
2
3
4
5
6
systemctl stop pve-cluster corosync
pmxcfs -l                      # start the cluster filesystem in local mode
rm /etc/pve/corosync.conf
rm -r /etc/corosync/*
killall pmxcfs
systemctl start pve-cluster
Then recreate. Do this before any node joins and it costs you two minutes. Afterwards, you repeat it on every node.
2. The join info showed an address I had already changed
The cluster join information contained the old management IP even though corosync was correct. That field is not corosync at all: it is the API endpoint a joining node uses to fetch the config, and it comes from resolving the node’s own hostname. In other words, /etc/hosts.
Fix the file on all three nodes, then refresh the cached copy:
1
systemctl restart pve-cluster pveproxy
Every node needs entries for all three nodes, not just for itself.
3. Hostname verification failed on join
1
500 Can't connect to 10.48.51.201:8006 (hostname verification failed)
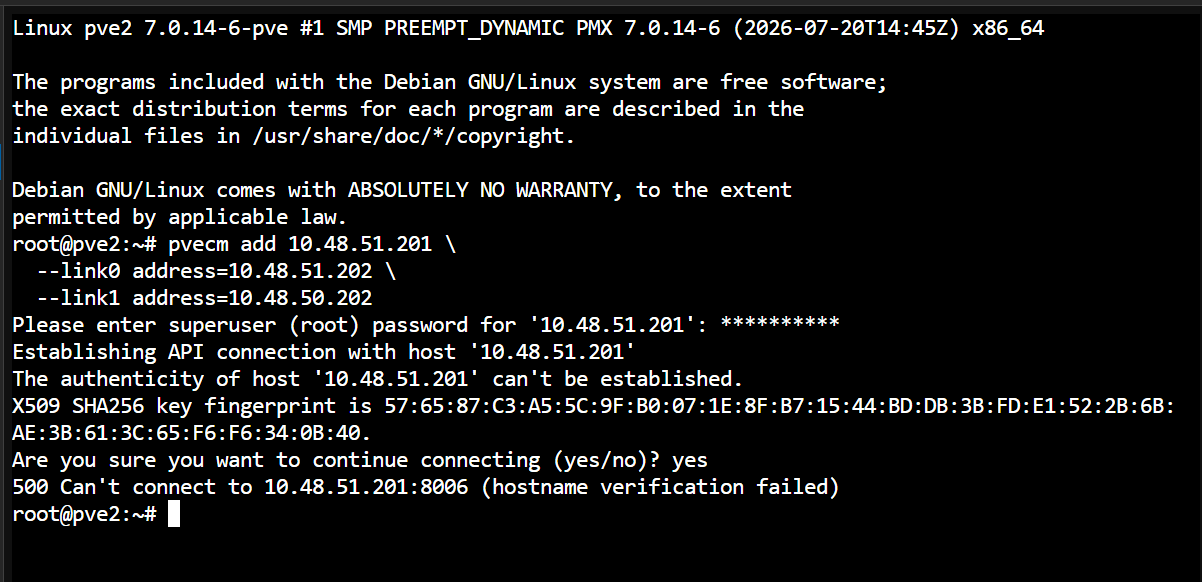 The fingerprint matched. The certificate SANs did not, because they still listed the address the node had at install time.
The fingerprint matched fine. The problem is that the node’s TLS certificate was generated at install time, so its SAN list contains the old address. Connecting by IP means the client checks the cert against that IP and finds no match.
Two fixes, and you want both:
1
2
pvecm updatecerts --force     # on every node, regenerates SANs from current IPs
systemctl restart pveproxy
And join by hostname rather than IP. The certificate always carries the node name and FQDN as DNS SANs, so name-based verification sidesteps this entire class of problem.
I was also joining via the corosync VLAN, which is wrong on its own terms. That VLAN is deliberately isolated and should not be carrying HTTPS. The address you pass to pvecm add is the API endpoint and belongs on management; the corosync addresses are the --link0 and --link1 arguments.
4. CephFS refused to be created
I wanted a CephFS for ISOs and container templates. It failed:
1
2
3
TASK ERROR: error with 'osd pool create': mon_cmd failed - pg_num 128 size 3
for this pool would result in 257 cumulative PGs per OSD which exceeds the
mon_max_pg_per_osd value of 250
This was my own fault. I had set bulk true on the RBD pool, which tells the autoscaler to size it for the whole cluster. It took 128 placement groups, and on three OSDs that is essentially the entire budget.
Do not raise mon_max_pg_per_osd. It is a guardrail doing its job. Shrink the pool instead:
1
2
ceph osd pool set vmdata bulk false
ceph osd pool set vmdata pg_num 32
The rule of thumb: your total PG budget is roughly 100 PGs per OSD divided by your replica count, so with 3 OSDs and size=3 you get about 100 PGs across all pools combined. Skip bulk entirely at this OSD count. It only makes sense once you have enough OSDs that the budget is not the constraint. Add drives later and the autoscaler scales the pools up on its own.
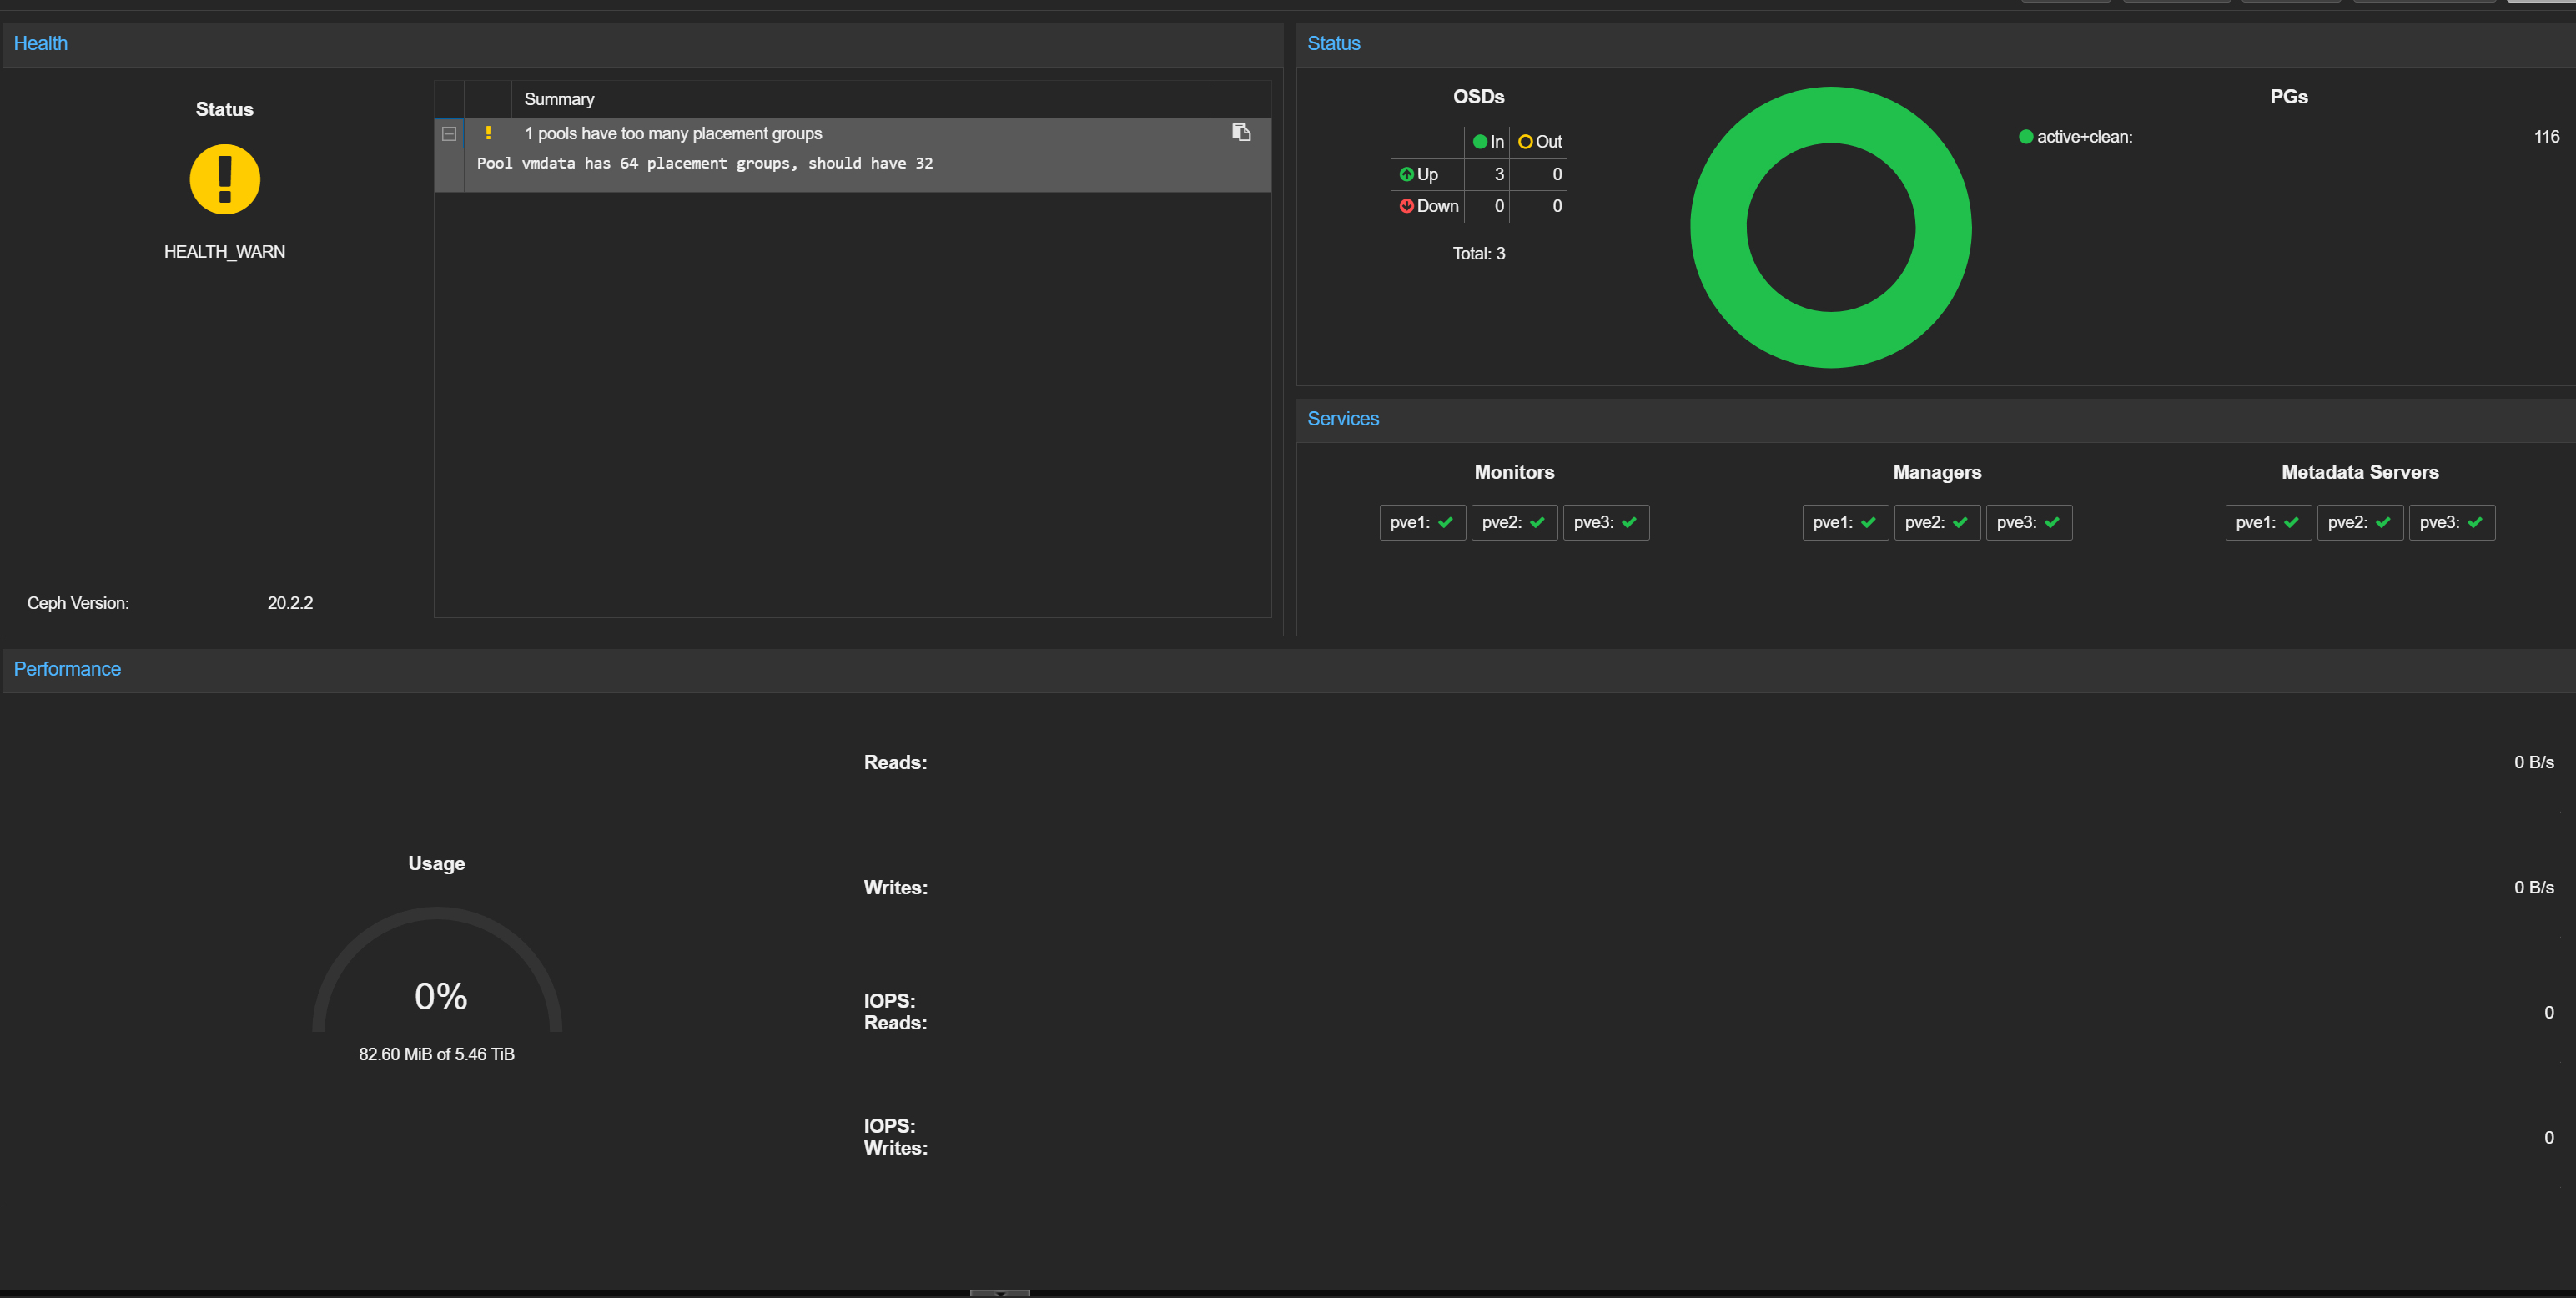 Healthy underneath: three OSDs up, all PGs active and clean. The warning is only the autoscaler asking for a smaller pg_num.
What to expect once it is running
With 3 OSDs at 2TB and the default size=3 / min_size=2, you get roughly 2TB raw usable, or about 1.6TB practical once Ceph’s 85% warning threshold is accounted for.
Two behaviours to accept rather than fight:
A node down means degraded, permanently. The cluster stays up and writable at min_size=2, but it will never return to HEALTH_OK while a node is missing, because there is nowhere to place the third replica. That is correct. Do not lower min_size to 1 to silence the warning; that is how you lose data.
One OSD per node means no self-healing. If a drive dies, the cluster sits degraded until you physically replace it. Two OSDs per node fixes this, but only if they are matched in size: a 1TB drive cannot absorb a failed 2TB sibling’s placement groups, so an asymmetric pair gives you a partial version of the benefit at best.
For Windows guests on RBD, use VirtIO SCSI single with writeback cache enabled. It matters more to how the guest feels than anything you do on the network side.
FAQ
Can I run Ceph on 1GbE? Technically yes, and it will start. But replication means every client write generates two more writes across the network, so 1GbE becomes the bottleneck almost immediately and recovery takes a very long time. 10GbE is the realistic floor for a cluster you intend to actually use.
Do I need jumbo frames for Ceph? No, it works fine at 1500. Jumbo buys you roughly 5 to 10 percent throughput and slightly lower CPU. It is worth taking when it is free, which it is in this design because Ceph sits on its own bare interface. It is not worth contorting your bridge layout for.
Should the Ceph public and cluster networks be separate? Only if they would use separate physical links. On a single link, splitting them adds configuration to keep in sync and changes nothing about the traffic. Set the public network and leave the cluster network blank.
Why is my cluster showing HEALTH_WARN with a node down? That is expected on a 3-node cluster. With size=3 and a host-level failure domain, losing a node leaves nowhere for the third replica. The cluster is still readable and writable at min_size=2. It clears when the node returns.
Can I live migrate a VM with a passed-through GPU? No. Full PCI passthrough holds device state the hypervisor cannot copy to another host. The “Live Migration Capable” checkbox on a resource mapping is an assertion that the hardware supports migratable state (SR-IOV vGPUs, essentially), not something that adds the capability. On a plain passthrough iGPU it will attempt the migration and fail. Offline migration works fine, and a cluster-wide resource mapping is what makes it clean.
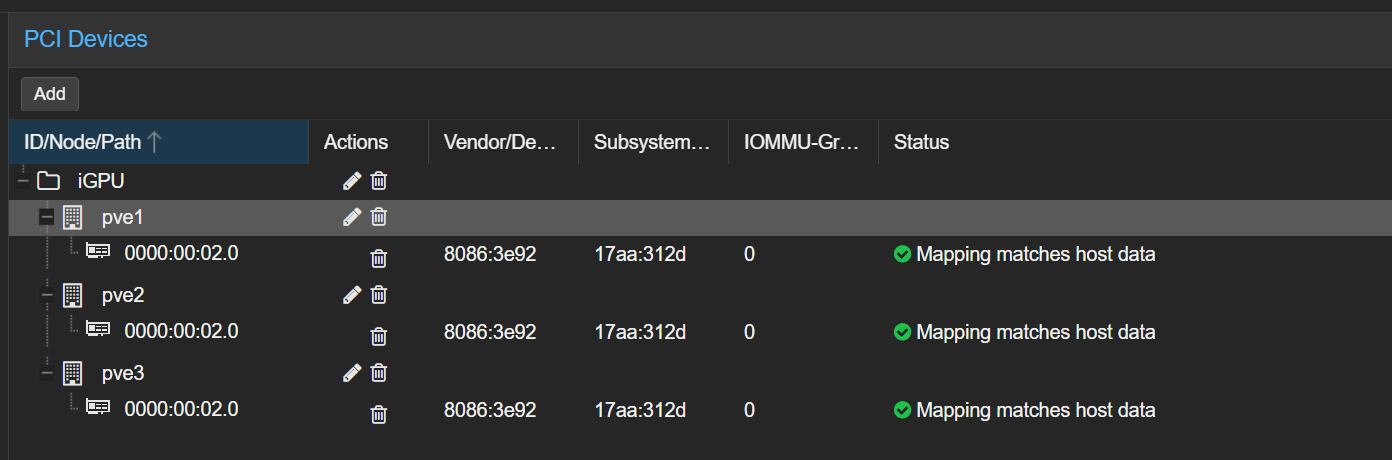 A cluster-wide mapping is still worth doing. It is what lets an offline migration find the right local device on the target node.
 This checkbox asserts the hardware supports migratable state. It does not create the capability.
Recap
Two 10G ports per node is a real constraint, and it forces one decision: split by role or bond and share. Splitting wins here because it makes jumbo frames free, keeps corosync’s rings on physically separate ports, and gives Ceph a deterministic 10G instead of a statistical share of 20G that LACP hashing may not deliver anyway.
Almost everything that went wrong for me was ordering, not configuration. Get every node onto its final addresses, its final hostnames and its final certificates before you create the cluster, and most of this post never happens to you.
I am covering the dedicated Proxmox Backup Server for this cluster in a follow-up, since that deserves its own post rather than a footnote here.
Prefer to watch? Join me on Mylemans Online.
Networking is the part of a homelab that quietly decides how well everything else works, and it is the part most guides skip past. The IT Foundations path on Mylemans Labs builds that layer properly: VLANs, subnetting, and switching, hands-on, before you need them at 1am. Start it at labs.mylemans.online.